I still remember the first time I tried strobing makeup — I expected a full glam transformation, but all I really did was swipe a little highlighter on my cheekbones and call it a day. Honestly? It worked. That lit-from-within glow was exactly what my skin needed without the heavy contouring drama.
If you’ve been curious about strobing but don’t know where to start, this guide will walk you through everything — from what it actually is to how to do it on your skin tone.
Read Also: Seint Makeup Reviews: Is It Really Worth the Hype?
What Is Strobing Makeup?
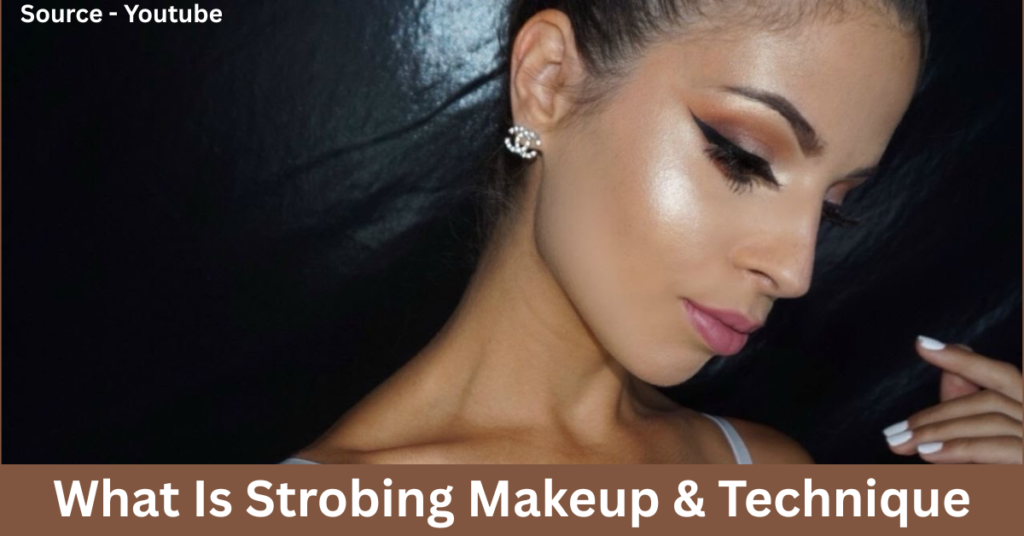
Strobing makeup is a technique where you use highlighter and light-reflecting products to make your skin look naturally radiant and glowing. Instead of sculpting your face with dark shades like contouring, strobing focuses only on the bright, high points of your face — your cheekbones, brow bone, nose bridge, and cupid’s bow.
Think of it as skipping the shadows and going straight for the light. The result is a dewy, fresh-faced glow that looks effortless. It works beautifully for everyday wear when you want your skin to look alive without feeling like you’re wearing a full face of makeup.
Strobing vs Highlighting: What’s the Difference?
Here’s where most people get confused — and honestly, the confusion is fair. Strobing and highlighting are closely related, but they’re not the same thing.
Highlighting is just one step in your overall makeup routine. You apply a shimmery product on top of your foundation and contour to add a little brightness. Strobing, on the other hand, replaces heavy makeup steps altogether.
You skip the thick contouring and let the glow do the work. It’s more of a full makeup philosophy than just an extra step. So if highlighting is a finishing touch, strobing is the whole approach.
Contouring vs Strobing: What’s the Difference?
Contouring uses deeper, matte shades to create shadows and make certain features appear smaller or more defined — your nose, jawline, forehead. It’s a sculpting technique. Strobing is the opposite. You’re not adding shadow; you’re adding light to areas that naturally catch it.
Both techniques shape your face, just through different methods. Contouring works best for bold, editorial looks. Strobing is your go-to when you want a natural, glowing finish — especially for daytime or summer makeup when heavy products feel like too much.
Essential Products for Perfect Strobing Makeup
You don’t need a lot of products to strobe well. Here’s what actually matters:
- Liquid Illuminators and Strobing Creams: These give the most natural, skin-like glow. Mix them into your foundation or apply directly on bare skin. They blend easily and don’t look patchy.
- Powder Highlighters for Layering: If you want more intensity, dust a powder highlighter on top of your liquid base. This builds the glow without overdoing it.
- Foundation Choices for Glowy Skin: Skip matte foundations on strobing days. Go for a satin or luminous finish foundation — it creates the perfect canvas for your highlighter to blend into seamlessly.
- Tools and Brushes for Face Highlighting: A fan brush works well for a diffused, natural highlight. For a more concentrated pop of glow on your cheekbones, use a small tapered brush and tap the product on rather than sweep it.
How to Do Strobing Makeup Step by Step
Once you have your products ready, the actual process is surprisingly simple.
Step 1: Moisturize and Prime
Start with a hydrating moisturizer — this is non-negotiable for strobing. Glowing skin needs a smooth, plump base. Follow it up with an illuminating primer rather than a mattifying one. This sets the tone for everything that comes next.
Step 2: Apply Foundation and Color Correct
Keep your base light. A sheer or medium-coverage foundation with a natural finish works best. If you have any discoloration or dark spots, color correct those areas first so your glow sits on an even base.
Step 3: Conceal Imperfections
Use a brightening concealer under your eyes and on any blemishes. The key here is to blend it well so it doesn’t sit heavy on your skin. You want your skin to look perfected, not caked.
Step 4: Strobe and Glow!
Now the fun part. Apply your liquid illuminator or cream highlighter on your cheekbones, brow bone, the tip and bridge of your nose, your cupid’s bow, and the inner corners of your eyes. Blend with your fingers or a damp sponge for the most natural finish. Set lightly with a powder highlighter if you want the look to last longer.
Where to Apply Highlighter: Mapping Your Face’s High Points
Getting the placement right is what separates a natural strobe from a blinding, disco-ball effect.
Primary Zones for Face Highlighting
Your cheekbones are always the starting point. Apply highlighter just above the hollows of your cheeks — this is where light naturally hits your face. Then move to your brow bone, the bridge of your nose, and your cupid’s bow.
Secondary Areas for Advanced Strobing
Once you’re comfortable with the basics, you can add highlighter to the inner corners of your eyes to make them look bigger and more awake, the tip of your chin for a lifted look, and the center of your forehead to balance the glow.
Face Shape Considerations
Not every placement works for every face shape. If you have a round face, keep the highlight on the upper cheekbones rather than the apple of your cheeks to avoid emphasizing roundness. For longer faces, a touch of highlight on the center of your forehead and chin can add dimension without elongating further.
Best Strobing Makeup for Every Skin Tone
Best Strobing Makeup for Fair Skin
Stick to pearl-toned or champagne highlighters. Gold can pull orange on very fair skin. Liquid illuminators in soft pink or silver tones look the most natural.
Best Strobing Makeup for Medium Skin
Golden and rose-gold shades are your best friends. They complement warm undertones beautifully and give a rich, sun-kissed glow without looking frosty.
Best Strobing Makeup for Olive Skin
Deep gold and bronze-toned highlighters work best. Avoid anything too silver or icy — it can look ashy against olive undertones.
Best Strobing Makeup for Dark Skin
Go bold. Rich copper, bronze, and warm gold shades look absolutely stunning on deeper skin tones. Sheer or barely-there highlighters tend to disappear, so don’t be afraid of intense pigment.
Pro Tips for Different Skin Types
Your skin type affects how your highlight sits and lasts, so adjust your approach accordingly.
If you have oily skin, use a powder highlighter over a mattifying primer. This helps the glow stay put without your skin looking greasy by midday. Avoid applying liquid illuminator directly on oily zones.
For dry skin, liquid and cream illuminators are your best option. They melt into the skin and look naturally dewy rather than flaky. Always layer over a good moisturizer.
Combination skin can mix both — use a cream highlighter on drier areas like your brow bone and nose bridge, and a powder highlighter on your cheekbones where you might get oilier.
Common Strobing Mistakes and How to Fix Them
- Over-Application Issues Less is always more with strobing. If your highlight looks blinding in natural light, you’ve gone too far. Blend the edges out with a clean sponge or buff brush to soften it.
- Wrong Product Placement Applying highlighter too low on your cheeks — closer to the apple — makes your face look rounder and can actually flatten your features. Always apply on the top of your cheekbone, closest to your temple.
- Undertone Mismatches Using a highlighter that clashes with your undertone is the most common strobing mistake. Cool undertones need silver and pink highlights. Warm undertones need gold and bronze. When in doubt, swatch on your wrist before buying.
- Skipping Base Preparation Strobing on unprepared skin is asking for trouble. Dry patches, uneven texture, and large pores will all catch and emphasize glitter particles. Always moisturize and prime before you strobe.
Frequently Asked Questions
What is the strobing makeup technique?
Strobing is a makeup technique that uses highlighters and light-reflecting products to create a natural, glowing complexion. Instead of contouring with shadow, you focus only on illuminating the high points of your face.
What is the difference between strobing and contouring?
Contouring adds shadow to define and sculpt your features. Strobing adds light to the high points of your face for a glow-from-within effect. They work in opposite ways — contouring subtracts, strobing brightens.
What is the best strobing technique for beginners?
Start with a liquid illuminator mixed into your foundation or applied on your cheekbones only. Keep it minimal and blend well. As you get more comfortable, gradually add more placement points.
Can strobing work for all skin types?
Yes — but the products you use should match your skin type. Oily skin does better with powder highlighters, while dry skin benefits more from creamy liquid formulas.
How long does strobing makeup last?
With the right base and a light setting spray, strobing makeup can last 6–8 hours comfortably. Oily skin may need a midday touch-up with a pressed powder highlighter.
Final Thoughts
Strobing is one of those makeup techniques that sounds complicated until you actually try it — and then you wonder why you ever bothered with anything heavier. It’s forgiving, it’s fast, and when done right, it makes your skin look like it’s glowing from the inside out. Start simple, pick the right shade for your skin tone, and don’t be afraid to use your fingers to blend. Your strobe era starts now.
Other Useful Links: How To: Strobing / Highlighting techniques
Priya is a dedicated skincare enthusiast and wellness researcher with over 10 years of experience in the beauty industry. She specializes in analyzing cosmetic formulations and simplifying complex skincare routines for everyday use. Through Glowvedas, she aims to empower readers with science-backed advice and honest reviews to help them achieve their most radiant self.